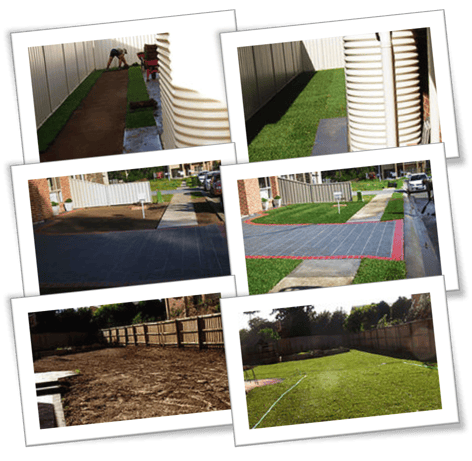
 Befores & Afters are great for everyone: home owners, councils, businesses and tradies alike!
Anyone who's done renovation of any sort - in their home, on their outdoor landscape - knows how awesome before and after pictures can be.
From nostalgia to satisfaction, for reviewing the work or simply for the enjoyment of seeing your efforts take shape in picture form, there are many reasons to take and safekeep all your before and after shots.
So I've put together a set of simple tips to help you take and make use out of your before and after re-landscaping pictures - without having to be an professional photographer!
Tips to Taking Great Before & After Landscaping Pictures
- Make sure you have awesome lighting. Where possible, take your photos on a bright day when the sun is at its best smiling straight down on your project area!
- Look for a focal point. This could be a feature on your home (a chimney, an interesting window), a tree or bush, the goals on a sports ground, etc. Take both your before and after shots at the exact same vantage point.
- Find a perspective marker. Ever seen a photo of something with a random object like a pen lying next to it? The pen is used to provide an understanding of how big the actual subject is. By capturing perspective markers - like the sky, a car, a post box, etc, you immediately add comprehension to your landscape.
- Create depth. Use points of interest in your foreground to help create the depth your before and after photos need.
- Take progress shots . The bigger the project, the more opportunities you'll have for progress shots. Let those images tell your re-landscaping story!
- Show the new area in action. And finally, take a picture with the area in use! A new fresh lawn screams "let's have a family picnic or soccer match", new daycare turf begs for play equipment and kids enjoying it. It's time to show the human element enjoying the fruits of your labour!
Tips to Using Your Before & After Re-Landscaping Pictures
- Homeowners - begin your "Home Portfolio".
- You have pictures of your kids and pets growing up, why not have an album for how your home has matured? And it's not just awesome to sift through every now and again...
- Dig your Home Portfolio out when it's time to sell and you'll be surprised how much added value your agent and prospective buyers suddenly see! Cha-ching!
- Tradies, landscapers, builders, etc.
- Use your before and after pictures as proof of your work. Get permission from your customers to feature their home / landscape pictures in your business portfolio, online and in other promotional material.
- Add your befores and afters to your website and social media.
- Feature your project as a blog or a case study to send out to your prospective customers.
- Stamp them (gracefully!) with your logo and offer your customers a "Before & After Portfolio Pack" for them to admire, add to their Home Portfolio, and show off to their friends while promoting your business at the same time!
Take a look at some of our Green Life Turf before and after work here.
And why not tell us a little more about the project you've got coming up in the comments section below? I'd love to hear about it!
Patrick | Grass Guru


